Nail the half-kneeling landmine press setup with this detailed guide to maximize shoulder strength and stability.
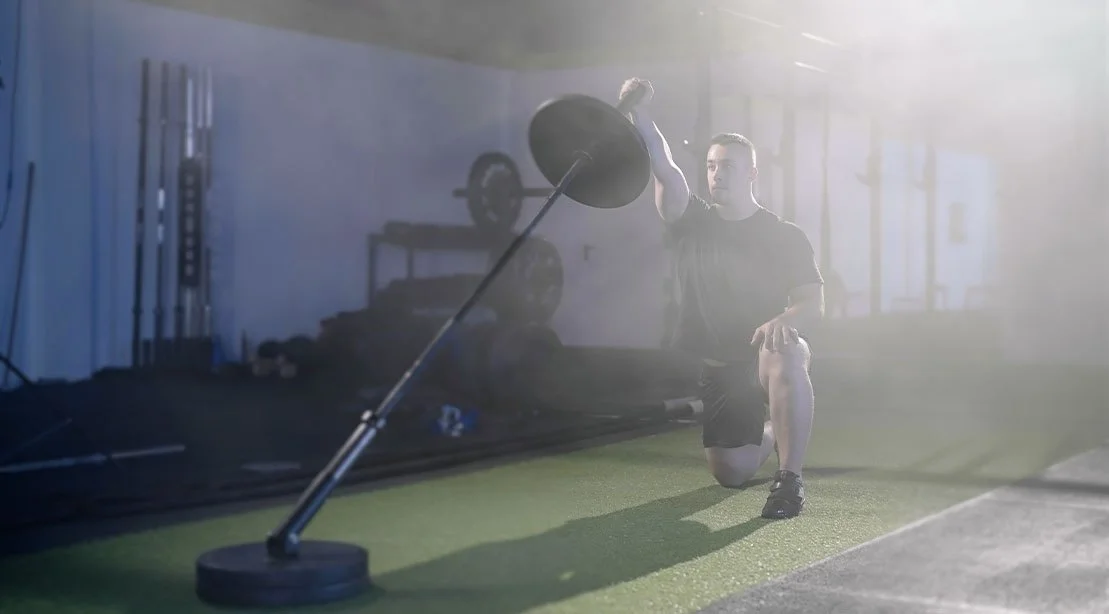
The Essentials of the Half-Kneeling Landmine Press
The half-kneeling landmine press may appear straightforward, but the nuances in its setup can significantly impact performance and results. It's not just about pressing; it's about how you establish your position for optimal effectiveness.
Choosing the Right Knee Position
The first decision revolves around which knee to lower. If pressing with your right arm, lowering the left knee while keeping the right foot forward is known as the ipsilateral setup. Alternatively, the contralateral setup involves lowering the right knee with the left foot forward. Each position offers unique stabilizing benefits:
- Contralateral Setup: This method enhances assistance from your back hip, providing greater freedom for shoulder motion during the press.
- Ipsilateral Setup: This alternative creates a cross-body diagonal tension and challenges stability while pressing.
The recommendation is to start with the contralateral option for better stability and then experiment with the ipsilateral arrangement to see which offers the most effective press for your individual biomechanics.
Refining Your Stance for Stability
Next, it’s crucial to establish an effective stance. Begin by positioning your front foot with the ankle directly beneath the knee, and the back knee should be aligned under your hip rather than extended too far back. Aim for a wider lateral base for enhanced stability:
- Your front knee should sit directly over your front foot.
- The back knee should be directly under your hip.
- Maintain space between the front foot and back knee to mitigate rotational forces.
- Ensure your hips are level and facing forward, lightly squeezing your glute on the down knee side.
An effective cue for maintaining this stance is to visualize your legs like two parallel railroad tracks.
Selecting Your Grip
Grip choice plays a vital role in executing the half-kneeling landmine press. You can either grip the end of the barbell or the sleeve itself—your personal comfort and hand size will dictate the best option:
- Cupped End-of-Bar Grip: Involves cupping the end of the bar with your palm and wrapping your fingers around the sleeve.
- Sleeve Grip: This option involves holding the sleeve directly, either wrapping your fingers around it or placing your thumb at the end.
Regardless of your grip, ensure that it's firm, with your wrist maintained in a neutral and stacked position for maximal strength.
Finding Your Optimal Distance
How far should you be from the landmine? The key is to establish a position where you can control the barbell without straining or leaning back. A good rule of thumb is to ensure that:
- The bar's end is oriented toward your working shoulder.
- You remain upright instead of leaning forward.
- Adjust your distance based on your comfort—move closer if you feel the need to reach, or slightly further if the bar feels intrusive.
A helpful internal cue is to allow your shoulder space to move freely.
Adjusting Your Pressing Position
Position your elbow slightly forward and underneath your hand for effective force transfer. This aligns your forearm properly with the bar’s angled path. Key pointers include:
- Your elbow should be held tightly under and slightly in front of your hand.
- Maintain a stable wrist and secure grip.
- Lower your shoulder naturally without forcing it back, keeping your chest lifted.
Visualizing the trajectory of the barbell can help ensure proper alignment when you press.
Creating Core Stability
Before initiating the press, it's crucial to establish core tension. Take a deep breath and brace your core while ensuring pressure is maintained on your front foot. This solidifies stability and supports a powerful pressing motion:
- Inhale deeply into your belly.
- Engage your abs while keeping your posture upright.
- Ensure that your hips and shoulders maintain a forward-facing position.
Remember, many lifters neglect this bracing phase—don’t fall into that trap.
Checklist for Effective Setup
Before embarking on your first rep, run through this essential checklist to confirm you’re properly set up:
- Correct knee position chosen: ipsilateral or contralateral.
- A stable base firmly established.
- Optimal distance found, allowing for upright posture without excessive reach.
- Grip securely chosen for comfort and control.
- Bar positioned appropriately in front of your shoulder.
- Shoulders set properly with an upright chest.
- Ribs stacked over hips for alignment.
- Core and glute engaged properly.
- Hips and shoulders square to your setup.
If all these elements align, you’re ready to launch into your press.
Avoiding Common Mistakes
Rushing through the setup can lead to several mistakes that compromise performance:
Kneeling Position Errors
Setting up too close can result in shoulder crowding; being too far may invite awkward reaching. Adjusting your distance is crucial for comfort and effectiveness.
Grip Issues
Using a grip that doesn't suit your hand size can lead to wrist strain. Make the adjustment to your grip to ensure a neutral wrist position.
Back Positioning
An arched lower back is typically a symptom of being too close to the bar, flaring the ribs and exacerbating the issue upon pressing.
Lack of Tension
With a reduced base of support, tension throughout your body is vital for power. Before initiating your press, consciously build this tension.
The Importance of Setup
While the half-kneeling landmine press appears simple, details matter. Neglecting the fundamentals of setup can hinder your performance and gains. Optimal positioning lays the groundwork for a powerful press. Remember, your progress is worth the effort spent fine-tuning each aspect of your technique.


Discussion
Sign in to join the discussion.